I came up with the idea for these wings last year when my son was in kindergarten. He's in a dual language Spanish program and they were doing a traditional Mexican posada before Christmas break. I found out the week before that I needed to come up with an angel costume, and with no extra money in our budget I was forced to get creative! I wracked my brain for anything white in the house that I could use and came up with paper plates. So this year guess what I'm dressing up as for Halloween? And even better, I've made my first tutorial so you can make your own (easy-peasy last-minute) angel wings:

Materials:
- 11 plain white paper plates (3 for the center and 8 for the feathers)
- 2 strips of ribbon--I used gold ribbon measuring about 23 inches, you can make yours longer or shorter as needed.
- Hot glue gun
- Scissors
- Pencil or marker for drawing cut lines

Step 1: Draw out your cut lines. Each feather will end up being a slim crescent, leaving an eye shape in the middle of the paper plate. You can draw the lines on each of the 8 feather plates before you start cutting, draw as you go, or eyeball the whole thing--it's no big deal if they're not all exactly the same size.

Step 2: Cut out all of your feathers. I cut out 16 total, and again, make more or less as you see fit for your wings.

Step 3: Plan out where you want your feathers to go--but don't glue yet! You just want to get an idea for how you want to space the feathers so you won't have to rip it apart for a redo later.

Here are my feathers all mapped out. They don't look very even here, but I straightened them out more as I began gluing.

Step 4: Mark where you want your feathers to start and end. If you're a perfectionist, count the ridges between each set of marks to ensure that they're even.

Step 5: Start gluing!

Put a dime-sized amount of glue on the tip of each feather and press it down onto the center plate between your marks on either side. Don't worry about making a mess, because you'll be covering it all up with another plate.

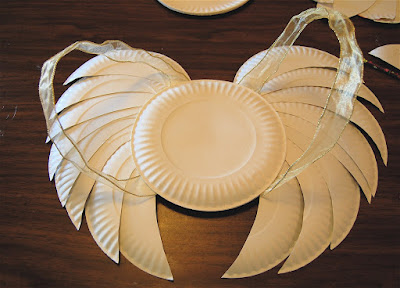
Here's one side completed.

And both sides.

Step 6: Now glue around the center of the plate and press your second plate with the back against the glue.

Step 7: Flip the wings over and get your ribbon ready for the arm straps. You can either mark out where you want the straps so that they're or even or eyeball it like I did.

Use the start and finish of your feathers as a guideline. This time, put the glue on the plate and gently press the ribbon into it. You may want to use the end of a pen or something so you don't burn your fingers.

Glue the second strap on the opposite side and your almost done!

Step 8: To finish add some more glue for the final plate, this will help hold the ribbon in and make the whole thing more stable.

Step 9: Press down the third whole plate and voila! you've got wings!

I made my wings during the kids' naps and finished it all (including picture taking) under thirty minutes. Now pair it with a white robe or all-white clothes and you've got your angel costume. Save the wings 'til December and your kids are ready for the Christmas play! I hope you all enjoy this--let me know if you end up making a pair!
Labels: christmas, costumes, halloween, homemade, tutorials


